LogoLogo
DownloadGet a QuoteConnect with Us
  • Introduction
    • What is Thinfinity® Workspace
    • About this Document
  • Product Overview
    • Architecture Components
    • Load Balancing
    • Deployment Scenarios Overview
    • Connectivity
      • Remote Desktop Access
      • Remote Application Access
      • Terminal Access
    • RPAM and Resource Reservation
    • Cloud Manager
    • Audit Logging
    • User Analytics
  • Getting Started
    • Basic Installation
    • Accessing Thinfinity® Workspace in Your Browser
    • Connection Types
      • Remote Desktop Connection
      • Remote App Connection
      • Remote Intranet Web App Connection
      • Telnet SSH Connection
    • Configuration
    • Security
    • Beyond the Basics
  • Reference
    • Thinfinity® Workspace Configuration Manager
      • General Tab
      • Broker Tab
      • Authentication Tab
        • Methods Tab
          • API Access Settings
          • RADIUS Settings
          • SAML Settings
          • OAuth 2.0 Settings
          • External DLL
        • Mappings Tab
        • 2FA Tab
        • Directory Services Tab
          • Local Computer Users Settings
          • Local Computer Users
          • Local Thinfinity IdP Settings
          • Computer Domain Settings
          • External Domain Settings
      • Access Profiles Tab
        • The [+] Access Profile
        • Desktop Access Profiles
          • RDC Access Profile
            • Core Settings
            • User Experience Settings
          • ThinVNC Access Profile
          • VNC/RFB Access Profile
            • User Experience Settings
        • Application Access Profiles
          • Remote App Access Profile
            • Core Settings
          • Web App Access Profiles
            • Web Link Access Profile
            • WAG Access Profile
          • VirtualUI App Access Profile
            • Core Settings
        • Web Folder Access Profile
        • Terminal Access Profiles
          • z/Scope Classic Access Profile
          • Telnet/SSH Access Profile
            • Core Settings
            • User Experience Settings
        • Label
        • Access Control Settings
      • VirtualUI Tab
      • Folders Tab
      • Permissions Tab
      • Protection Tab
      • Notifications Tab
      • Database Tab
      • z/Scope Classic Tab
      • Services Tab
      • License Tab
    • Thinfinity® Workspace Web Manager
      • Access Profiles
        • Desktop Access Profiles
          • RDC Access Profile
            • Core Settings
            • User Experience Settings
          • VNC
            • Core Settings
            • User Experience Settings
          • Thinfinity VNC
            • Core Settings
        • Application Access Profiles
          • Remote App
          • Web App
            • Web Application Gateway (WAG)
            • Web Link
          • VirtualUI App
        • Web Folder Access Profile
          • Core Settings
        • Terminal Access Profiles
          • Telnet SSH Terminal
          • Multi Terminal
        • Access Control Settings - Web Manager
      • Addons
        • Analytics
        • Brokers Monitor
        • Audit Log
        • Recordings
        • Members
        • Reports
        • Resource Reservation
    • Thinfinity® Gateway
  • Configuration
    • RBAC and Resource Reservation
      • Configuring the Resource Reservation Feature
      • Role Definition with Permissions Groups
      • Granting Approver or Requester Role to a User
      • Enabling Resource Reservation
      • Granting a User Access to a Single Access Profile
      • Granting Access Permissions for a Group of Access Profiles
      • Grouping Access Profiles Under a Label
      • Restricting Access to a Resource
      • Exception Days - No Booking Allowed
      • Booking a Resource
      • Approving a Booking Request
    • Security
      • Managing the SSL Certificate
        • Creating a Self-Signed Certificate
        • Creating a CA Certificate Request
        • Importing a Certificate
        • Using ACME Certificates
      • Session Recording
        • Viewing Recorded Sessions
    • User Experience
      • Bidirectional Audio Redirection
      • Customizing the Thinfinity® Workspace Toolbar
        • Using web.settings.js
        • Using the SDK 'connect' Method
        • Extend the Thinfinity® Workspace Toolbar
      • Customize Translation
      • GFX and H.264 Support
        • Enabling H.264 for an Access Profile
        • Preparing a Remote Desktop for H.264 Support
      • How to Enable Multi-Monitor
      • Multi-Touch Redirection
      • Redirecting Devices
      • Remote FX
      • Enhanced Browser and DPI Support
        • Display Model Inheritance
        • Properties Reference Tables
        • The Calculation Process
        • Example
    • Extended Features
      • Remote Active Directory
        • How to Install and Configure Thinfinity® Remote AD Services
        • Active Directory Credentials Mapping
      • WebBridge - Direct File Transfer
        • Installing Thinfinity® WebBridge
        • Using WebBridge
      • Silent Install Options
    • License Server Manager
      • Proxy Activation
      • Get a New Trial Serial Number
      • Activate a Serial Number Online
      • Activate a Serial Number Offline
      • Registering a License with License Server Manager
  • Deployment Scenarios
    • Single Machine Deployment
    • Distributed Deployment
    • Multitenant - Several Subdomains
    • Implementing Secondary Brokers Scenarios
      • Resource Pools
      • OT Networks
      • Multitenant - Single Domain
  • Integrations
    • Integrating Thinfinity® Workspace
    • External Authentication
      • API Key
    • Customizing the Web Interface
      • Customizing the Logo
      • Organizing custom files
    • One-Time-URL (OTURL)
      • Customizing OTURL Connection
      • Enabling Features
  • Mobile Devices
    • Mobile Devices
    • Accessing Thinfinity® Workspace
    • Mouse Control
    • Keyboards and Toolbars
    • Gestures
Powered by GitBook
On this page

Was this helpful?

  1. Configuration
  2. Security
  3. Managing the SSL Certificate

Creating a Self-Signed Certificate

PreviousManaging the SSL CertificateNextCreating a CA Certificate Request

Last updated 2 months ago

Was this helpful?

To create a self-signed certificate:

  1. Go to Thinfinity® Configuration Manager > General tab. Select the HTTPS binding/connection where you want to use the self-signed certificate then click Edit.

  2. In the Binding dialog window click New.

  3. In Manage SSL Certificate dialog window click Create a self-signed certificate.

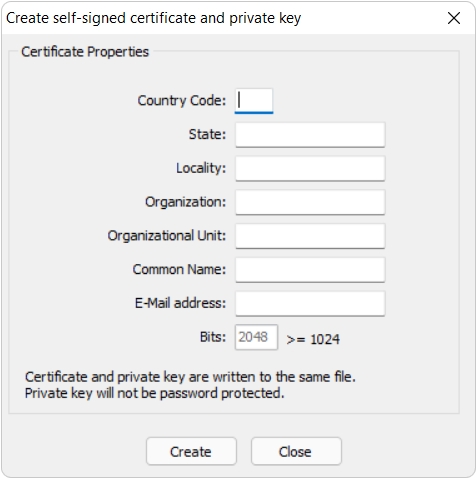
  4. Fill in the form shown below with your organization's data then click Create.

Option
Description

Country Code

The two-letter country code of the International Organization for Standardization (ISO 3166).

State

Full unabbreviated name of the state or province where your organization is located.

Locality

Full unabbreviated name of the city where your organization is located.

Organization

The name your company is legally registered under.

Organizational Unit

Use this field to differentiate between divisions within an organization.

Common Name

The domain name or URL you plan to use this certificate with. The Common Name field should be filled with the server+domain that will be used to access Thinfinity® Workspace (rdp.mycompany.com).

E-Mail Address

Company e-mail address.

Bits

We recommend using a 2048 length key.

  1. When clicking Create you will be offered the possibility to save the certificate in a location of your choice.

  2. Back in the Binding dialog window find the self-signed certificate in list available in the Certificate field and select it and click OK

  3. In the Thinfinity® Configuration Manager click Apply to implement the changes.

The application will start using the self-signed certificate you created.

Bear in mind that since this certificate is not issued by a known Certificate Authority (CA), web browsers will warn you they cannot verify its authority.

After the self-signed certificate is created and stored in the selected location, the certificate import wizard is launched. For details, see .

Importing a Certificate